"AUNZ Matrix" - Arbitraging on AUDNZD

Avatar
  • updated

Hi fellow traders,


I'd like to introduce you to a trading strategy I've developed called the "AUNZ Matrix", that leverages the historical correlation between the Australian dollar (AUD) and the New Zealand dollar (NZD).

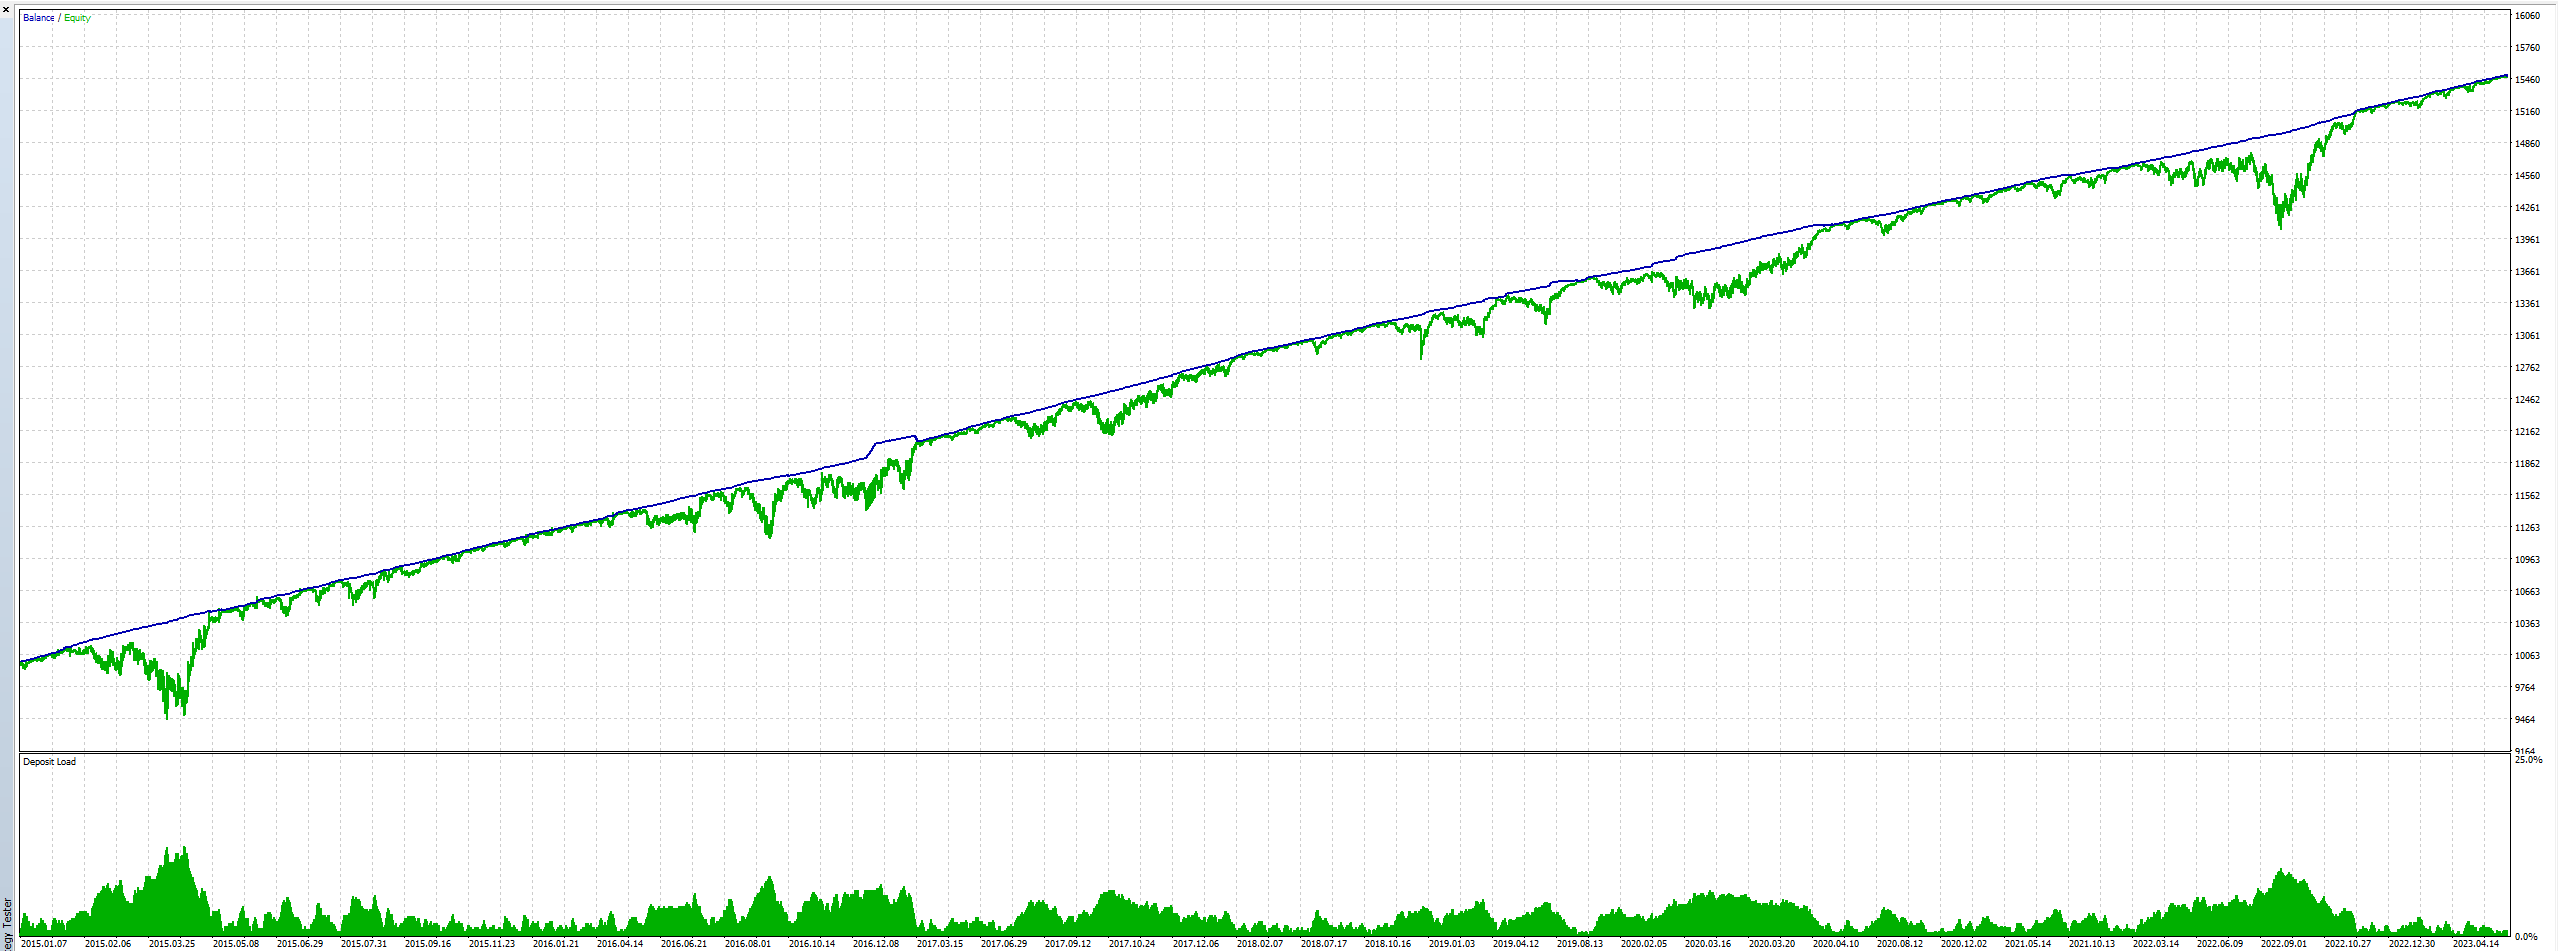
The Basic Idea: The core concept of the AUNZ Matrix is to create a grid of buy and sell orders on the AUDNZD pair. This currency pair has predominantly traded in a sideways range between 1.14 and 1.03 over the past decade. Each order within the grid comes with its own trailing exit. The primary objective is to generate consistent, albeit modest, profits by closing multiple orders within the grid. No Stop Losses are employed in this strategy.


the Dynamic Virtual Wall: While the basic strategy does work, it can result in a significant deposit load and a high drawdown percentage. To address this issue, I've incorporated a "dynamic virtual wall" into the strategy. This virtual wall divides the grid into two distinct zones: an upper zone and a lower zone. The wall is constructed using a weekly Bollinger Band with a 100-period SMA and a 0.5 deviation.

The virtual wall serves as a filter for the grid orders. In the upper zone, only sell orders are allowed, and in the lower zone, only buy orders are permitted. This adjustment dramatically reduces deposit load and drawdown percentage, albeit at a slight reduction in profit.  Additional filters can be implemented to optimize performance further.


Risk and Limitations: It's crucial to acknowledge the main risk associated with the "AUNZ Matrix" strategy. The primary risk factor is the potential decorrelation of the AUD and NZD. This can occur if the respective central banks change their monetary policy. Traders following this strategy must closely monitor central bank actions and be prepared to pause the bot if any significant policy changes are anticipated.

This precaution may result in some losses if the bot has open orders at the time of a potential decorrelation event. However, it's a necessary measure to protect your capital and align the strategy with changing market conditions.

Set File: I've attached a set file that you can use to test this strategy on your own. It serves as a starting point for further experimentation. You have the flexibility to tweak the parameters of the "martingale" grid or incorporate additional indicators and techniques to enhance its performance.


Exploring Future Possibilities: In my ongoing exploration of this strategy, I'm interested in developing a volatility-based grid, where the step size of the grid adjusts dynamically according to market conditions. Unfortunately, I haven't found a way to implement this with this EA yet. It appears that the "change steps" parameter does not function correctly when individual exits are used. It also seems that individual take profit, with volatility coef does not work properly. 
If anyone has insights into achieving this, please share your knowledge. Incremental step adjustments could be intriguing for incorporating very light lot multiplier techniques. After all, based on the core concept of this strategy, raising the aggressivity when the price action reach the boundaryes of the ranging channel could make sense.


CP Section used:

"Martingale Properties", for creating the grid.

"Individual Order Properties", for creating the individual exits.

"MA Filter #1 Prop." & "Volatility for Ma": for creating the Bollinger Bands

That's all.


I hope you find the "AUNZ Matrix" strategy intriguing as i do. Let's try to improve its performance and create a nice "ATM" by arbitraging the Kiwi Aussie correlation together. So feel free to share your thoughts and results.


Happy trading! ^^
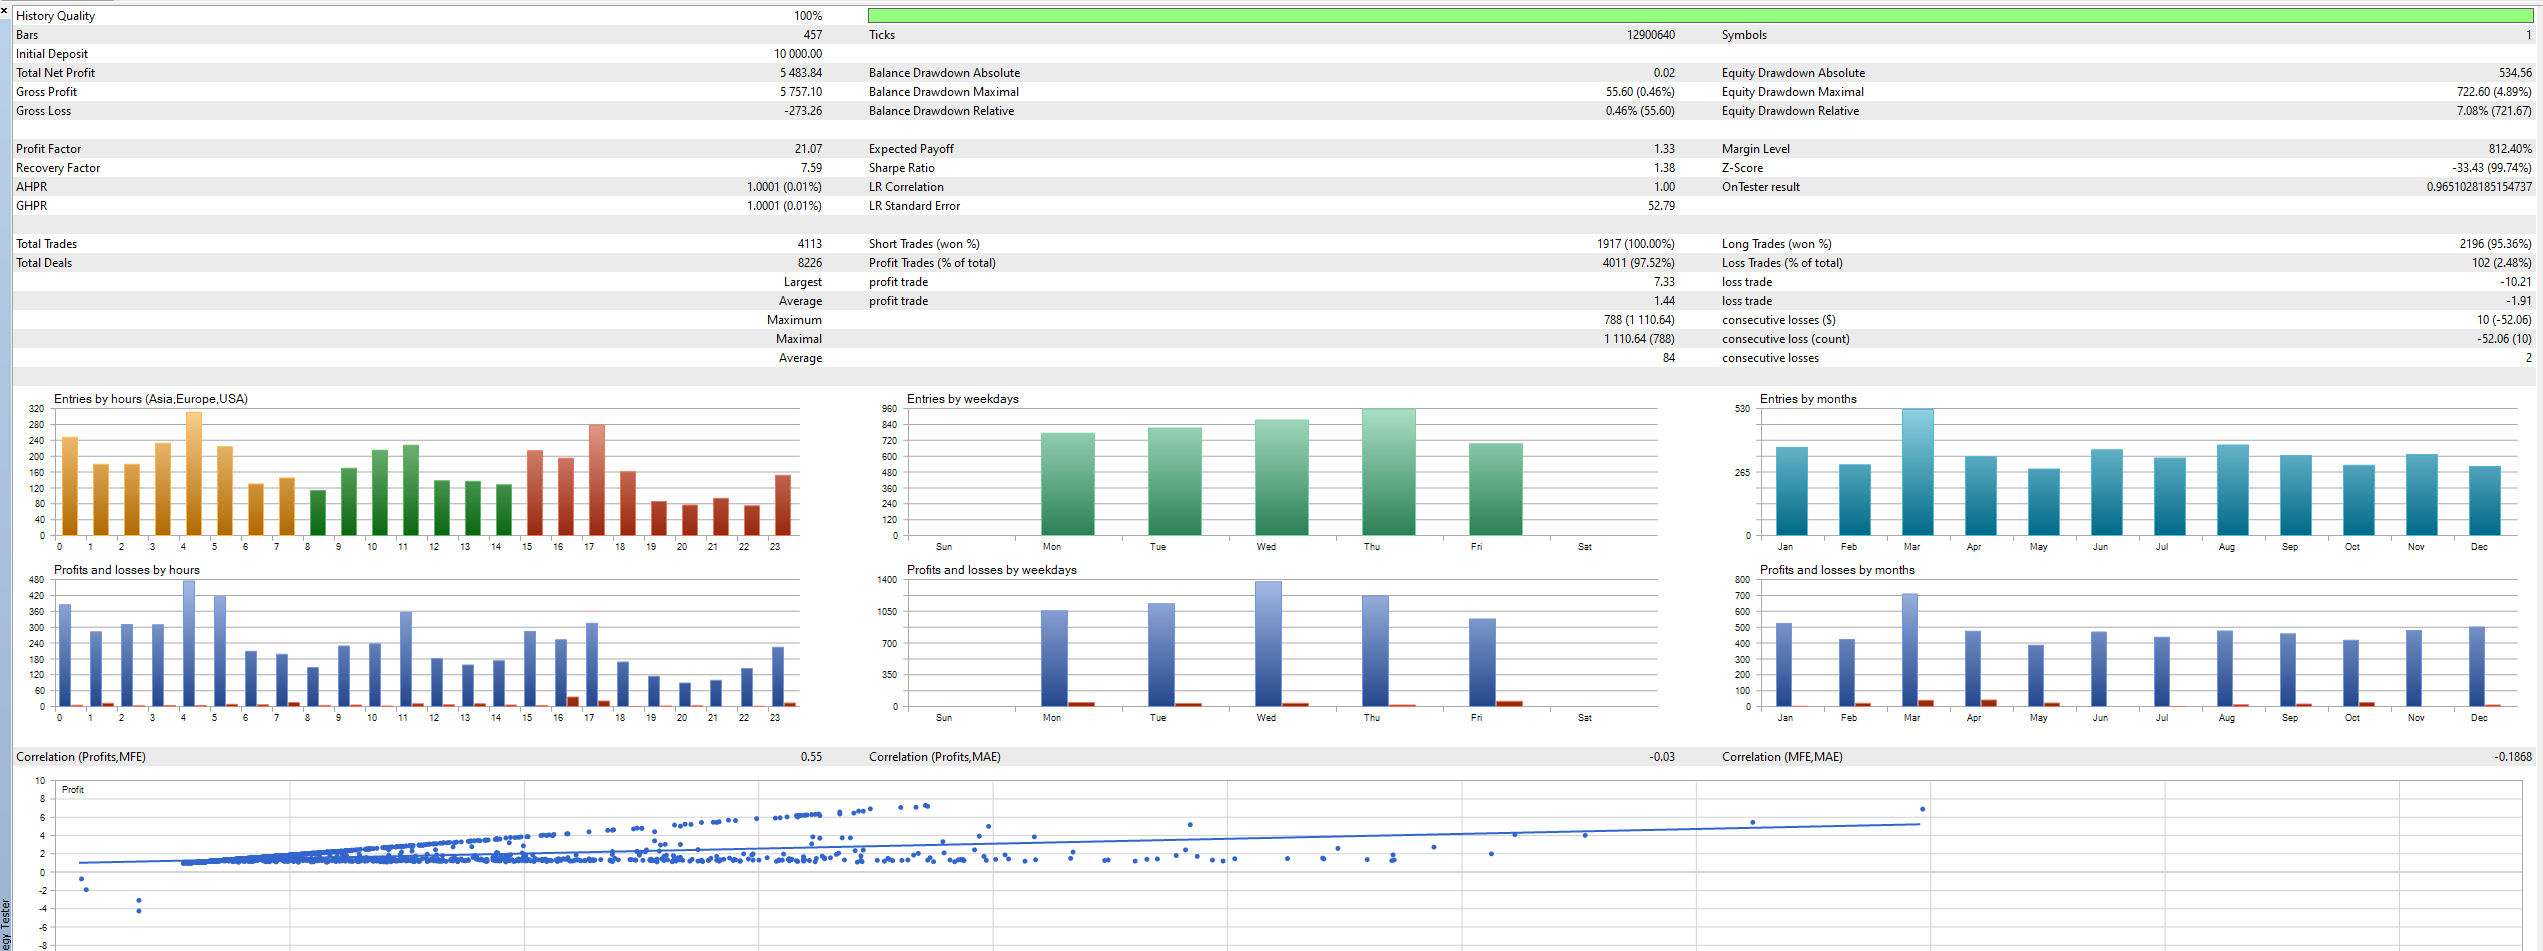
Image 5107

Image 5106


AUNZ Matrix v1.0.set

MT version:
Set for MT5 only
EA version:
2.55.5
Symbol:
AUDNZD
TimeFrame:
Weekly
Avatar
jay hu
Quote from Giamma

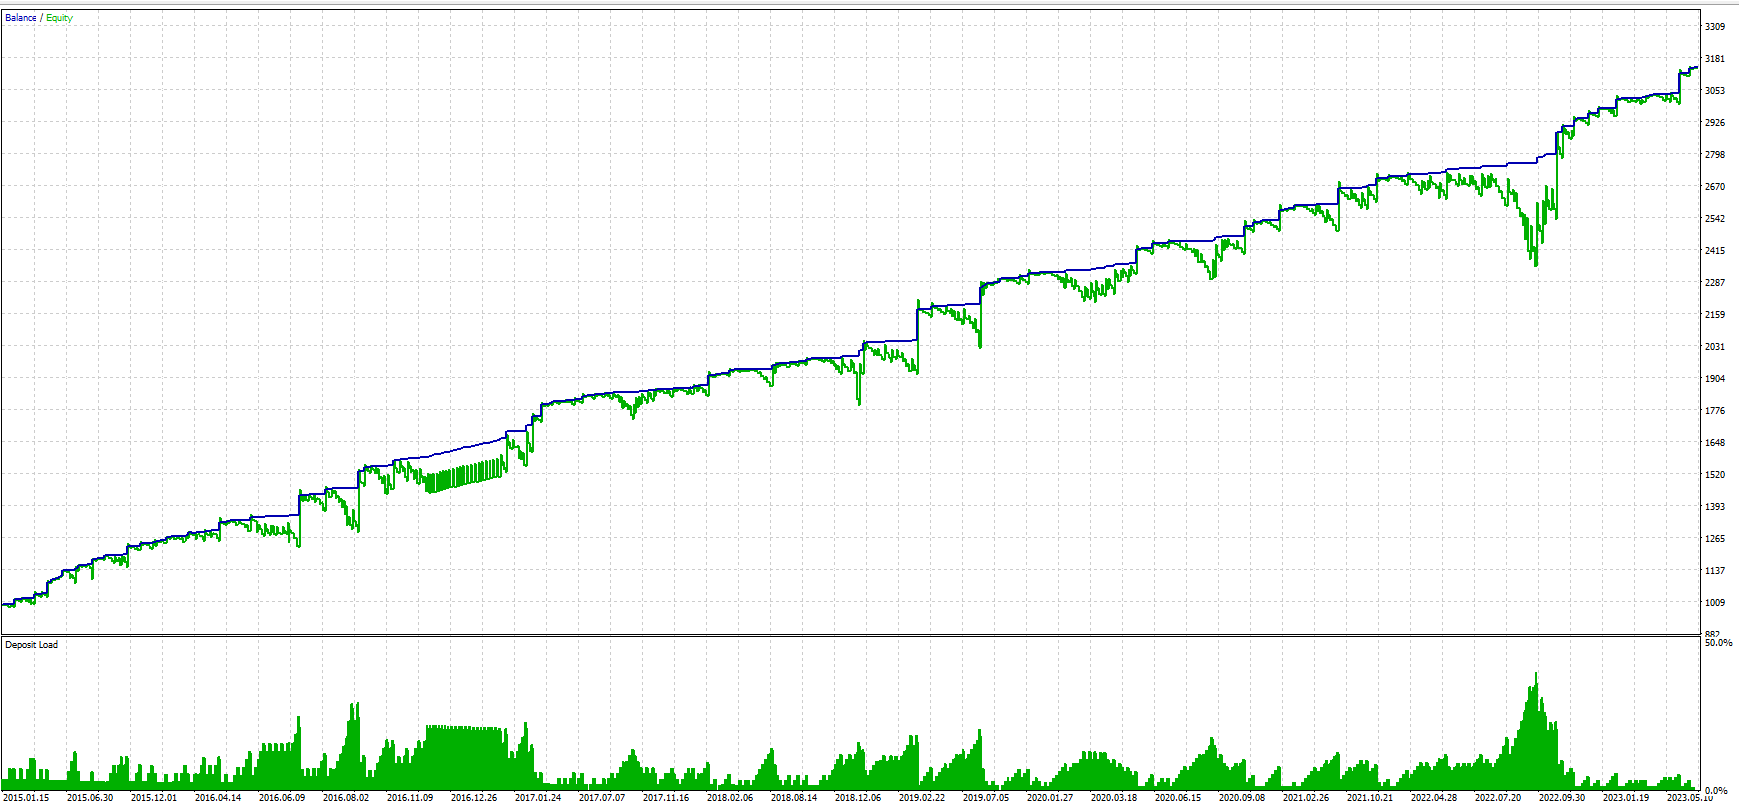
I've updated the AUNZ Matrix strategy I previously shared with you. Here's a concise overview of its core elements. My primary focus is on optimizing it for low capital to reduce risk and i will run this set live on my account, for further fine tuning. 

For backtesting, I used a 1,000 EUR initial investment, and achieved a maximum drawdown of 12%. Lower drawdowns is possible, but they may require adding additional filters, which could reduce profits. I employed 1-minute OHLC data along with visual mode inspections.
Timeframe for the tester: Weekly

-------------

The strategy maintains a "separation wall" between short orders on the upper side and buy orders on the lower side. I've made some key updates:


I.
 The series of orders begins with a "pending stop order" calculated based on a volatility coefficient, using a 20-period daily ATR. This delay at the start of a series helps mitigate risk during strong market momentum, which, otjherwise, would result in incresing deposit load and DD.  Many thanks to the user "jay hu", that is the author of this useful idea.

II. The grid step sizes now adapt to market volatility and may change over time, always with a minimum of 30 points. This approach connects the grid to price action behavior, offering more flexibility for the future.

III.
 Individual Trailing Stops have been extended. Backtesting has shown that trailing stops can significantly improve the risk/reward ratio in many instances.

IV.
A lot multiplier has been added, despite it is setted to be super super conservative (practically useless). The idea is to raise the value (now at 50) proportionally with the capital growth. WIth "500" you can make huge profit at the cost of hi DD%, especially at the beginning. Just test it out :) 

NOTE: i tried to test the partial close function but it did not show significant results. It is also true that, despite i understood what it does and i've read the tutorial, some parameters of that function remains a bit criptic to me. So i cannot exclude i tested it in an unproper way.

Image 5170


Image 5167

[CP-2.55.5] AUNZ Matrix v.21Ot23 (AUDNZD-W).set

Nice work! Giamma. The test result of new set:

Image 5252

Image 5253

Image 5254

Avatar
jay hu
Quote from Giamma

I've updated the AUNZ Matrix strategy I previously shared with you. Here's a concise overview of its core elements. My primary focus is on optimizing it for low capital to reduce risk and i will run this set live on my account, for further fine tuning. 

For backtesting, I used a 1,000 EUR initial investment, and achieved a maximum drawdown of 12%. Lower drawdowns is possible, but they may require adding additional filters, which could reduce profits. I employed 1-minute OHLC data along with visual mode inspections.
Timeframe for the tester: Weekly

-------------

The strategy maintains a "separation wall" between short orders on the upper side and buy orders on the lower side. I've made some key updates:


I.
 The series of orders begins with a "pending stop order" calculated based on a volatility coefficient, using a 20-period daily ATR. This delay at the start of a series helps mitigate risk during strong market momentum, which, otjherwise, would result in incresing deposit load and DD.  Many thanks to the user "jay hu", that is the author of this useful idea.

II. The grid step sizes now adapt to market volatility and may change over time, always with a minimum of 30 points. This approach connects the grid to price action behavior, offering more flexibility for the future.

III.
 Individual Trailing Stops have been extended. Backtesting has shown that trailing stops can significantly improve the risk/reward ratio in many instances.

IV.
A lot multiplier has been added, despite it is setted to be super super conservative (practically useless). The idea is to raise the value (now at 50) proportionally with the capital growth. WIth "500" you can make huge profit at the cost of hi DD%, especially at the beginning. Just test it out :) 

NOTE: i tried to test the partial close function but it did not show significant results. It is also true that, despite i understood what it does and i've read the tutorial, some parameters of that function remains a bit criptic to me. So i cannot exclude i tested it in an unproper way.

Image 5170


Image 5167

[CP-2.55.5] AUNZ Matrix v.21Ot23 (AUDNZD-W).set

Excellent strategy! Thank you for keeping improving this set.

Avatar
Giamma

I've updated the AUNZ Matrix strategy I previously shared with you. Here's a concise overview of its core elements. My primary focus is on optimizing it for low capital to reduce risk and i will run this set live on my account, for further fine tuning. 

For backtesting, I used a 1,000 EUR initial investment, and achieved a maximum drawdown of 12%. Lower drawdowns is possible, but they may require adding additional filters, which could reduce profits. I employed 1-minute OHLC data along with visual mode inspections.
Timeframe for the tester: Weekly

-------------

The strategy maintains a "separation wall" between short orders on the upper side and buy orders on the lower side. I've made some key updates:


I.
 The series of orders begins with a "pending stop order" calculated based on a volatility coefficient, using a 20-period daily ATR. This delay at the start of a series helps mitigate risk during strong market momentum, which, otjherwise, would result in incresing deposit load and DD.  Many thanks to the user "jay hu", that is the author of this useful idea.

II. The grid step sizes now adapt to market volatility and may change over time, always with a minimum of 30 points. This approach connects the grid to price action behavior, offering more flexibility for the future.

III.
 Individual Trailing Stops have been extended. Backtesting has shown that trailing stops can significantly improve the risk/reward ratio in many instances.

IV.
A lot multiplier has been added, despite it is setted to be super super conservative (practically useless). The idea is to raise the value (now at 50) proportionally with the capital growth. WIth "500" you can make huge profit at the cost of hi DD%, especially at the beginning. Just test it out :) 

NOTE: i tried to test the partial close function but it did not show significant results. It is also true that, despite i understood what it does and i've read the tutorial, some parameters of that function remains a bit criptic to me. So i cannot exclude i tested it in an unproper way.

Image 5170


Image 5167

[CP-2.55.5] AUNZ Matrix v.21Ot23 (AUDNZD-W).set

Avatar
jay hu
Quote from Giamma

Hi! Thank you ^^ The idea of the 'Entry with stop order' is nice as it gives you some 'space' before opening a grid series. I will test it today. Regarding the other parameters, they are probably not so useful, in my opinion. The Bollinger Bands already filter out long and short possibilities (unless you deactivated it). This means that if you are on the lower side of the channel, only buy orders are permitted anyway, and vice versa at the top. 

Great. I will remove those parameters and test it again. Thank you for your reply.

Avatar
Giamma
Quote from jay hu

Image 5139

Image 5140

Image 5141

Image 5142

Image 5143

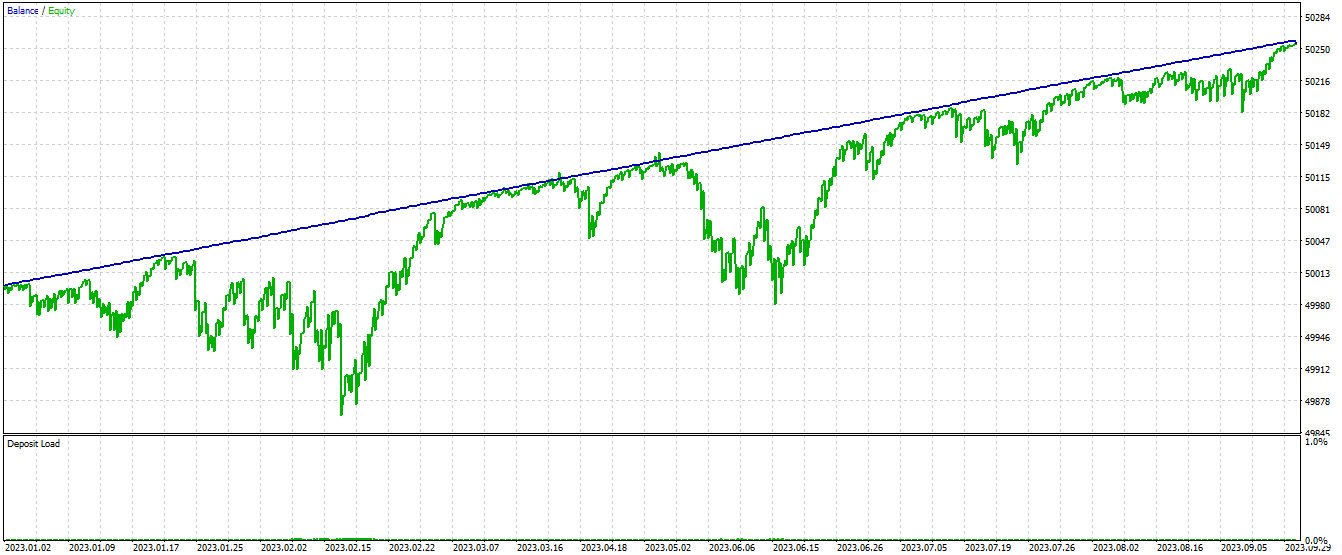
Above is the test result of the Blueberry Market direct 10k account. the only difference with Giamma's set is that I switched "Entry with stop order" on and set "Cancel on the opposite signal" and "Delete if opposite trade is open" is true. Please drop your comments or suggestions on how it could be improved. Ulises, I will add to your partial close function and test it again. Thank you.

Hi! Thank you ^^ The idea of the 'Entry with stop order' is nice as it gives you some 'space' before opening a grid series. I will test it today. Regarding the other parameters, they are probably not so useful, in my opinion. The Bollinger Bands already filter out long and short possibilities (unless you deactivated it). This means that if you are on the lower side of the channel, only buy orders are permitted anyway, and vice versa at the top. 

Avatar
jay hu
Quote from jay hu

Image 5139

Image 5140

Image 5141

Image 5142

Image 5143

Above is the test result of the Blueberry Market direct 10k account. the only difference with Giamma's set is that I switched "Entry with stop order" on and set "Cancel on the opposite signal" and "Delete if opposite trade is open" is true. Please drop your comments or suggestions on how it could be improved. Ulises, I will add to your partial close function and test it again. Thank you.

Here is the test result of a combination of partial close and pending stop order, the DD is smaller and the more profit could be locked. Hope to see more settings come so this set can be improved further.

Image 5145

Image 5146

Image 5147

Image 5148

Avatar
jay hu

Image 5139

Image 5140

Image 5141

Image 5142

Image 5143

Above is the test result of the Blueberry Market direct 10k account. the only difference with Giamma's set is that I switched "Entry with stop order" on and set "Cancel on the opposite signal" and "Delete if opposite trade is open" is true. Please drop your comments or suggestions on how it could be improved. Ulises, I will add to your partial close function and test it again. Thank you.

Avatar
Giamma
Quote from Ulises Cune

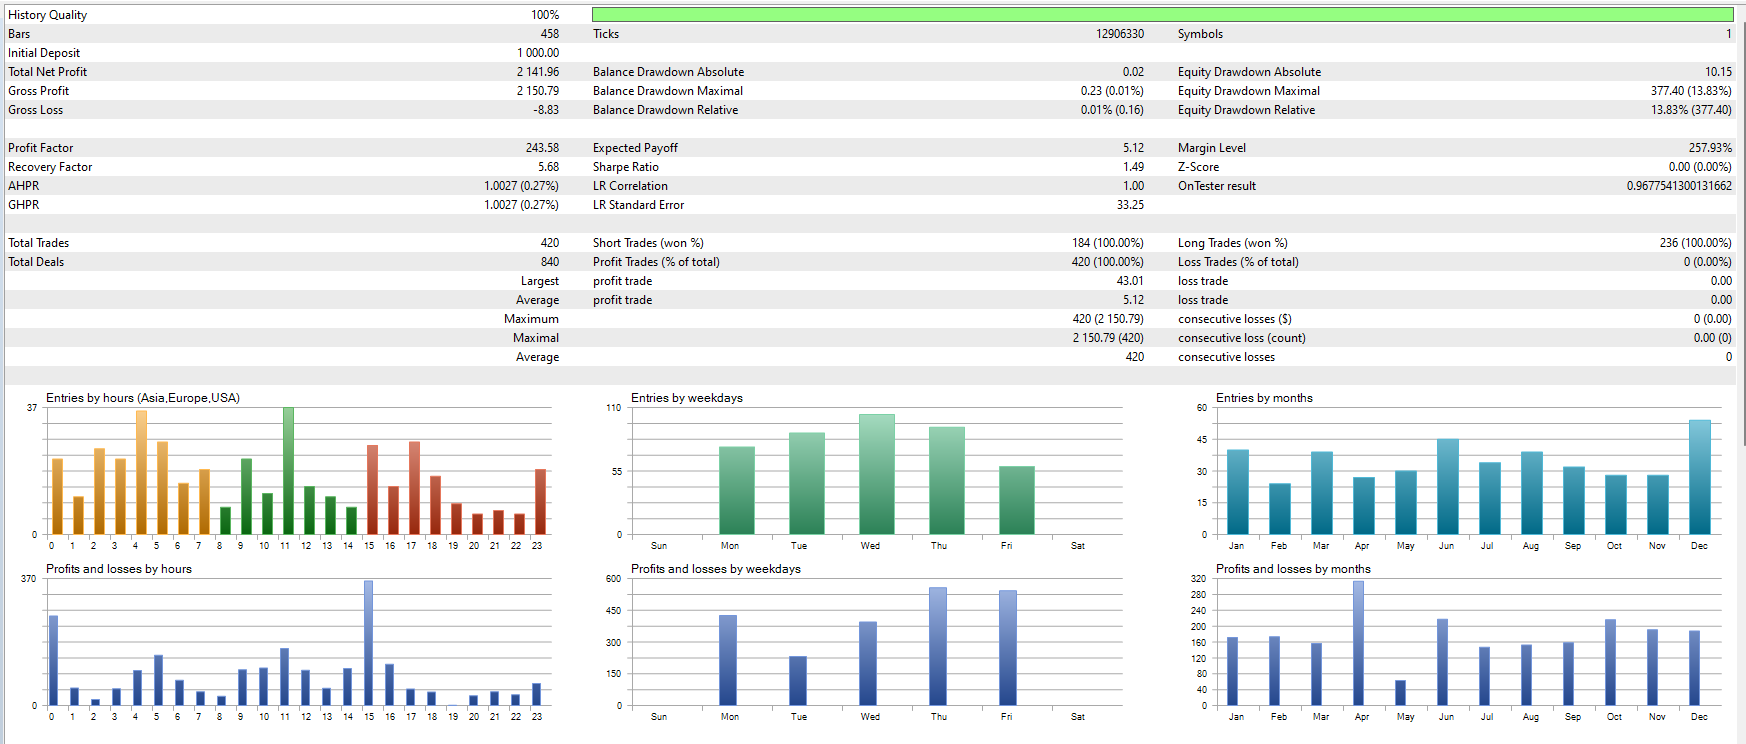
The strategy is yours. I don't judge her. I like that they make strategies with the new features that are implemented. This feature you are testing is interesting because it closes in "points" instead of "$". In previous versions of CP we had "Partial Close" with "Close profit itselft=true" which does the same as your strategy but closes at "$".
When using the AUD/NZD pair and converting it to USD, the points vary at the same $.
I took an average of how many $ it closes and it gave me $0.68 so I did the same strategy but using "Close profit itselft=true" just to test it.

It's interesting. Keep trying the new CP features.

AUNZ Matrix v1.0_ClosePartial.set

https://communitypowerea.com/docs/partial-close#close-profit-itself


Image 5136

Image 5137


I didn't consider this function; it's actually interesting. I'm currently doing some backtesting to figure out if it can generate a better risk-adjusted return. I'll share my test results if something promising emerges. Thank you!

Avatar
Ulises Cune
Quote from Giamma

Thank you for having tested the strategy. Can you please explain it better? You mean there are no stop losses or something else? 
Then, what initial capital and timeframe you used for the backtesting?

The strategy is yours. I don't judge her. I like that they make strategies with the new features that are implemented. This feature you are testing is interesting because it closes in "points" instead of "$". In previous versions of CP we had "Partial Close" with "Close profit itselft=true" which does the same as your strategy but closes at "$".
When using the AUD/NZD pair and converting it to USD, the points vary at the same $.
I took an average of how many $ it closes and it gave me $0.68 so I did the same strategy but using "Close profit itselft=true" just to test it.

It's interesting. Keep trying the new CP features.

AUNZ Matrix v1.0_ClosePartial.set

https://communitypowerea.com/docs/partial-close#close-profit-itself


Image 5136

Image 5137


Avatar
jay hu
Quote from Giamma

Hello! thanks for having tested it. 

Try to retest the strategy, using 10.000 as starting capital (not 300) and weekly or monthly timeframe, on the settings panel of the tester. Tell me how it goes :)

ok, will test it with a 10k account with weekly TF and report back. Thanks.